Linking products
For the integration to work beautifully, your products in the website and in the till will need to be mapped together. Your Nettl studio will help you link these together when we get started working together, but this guide will help you understand how to keep products linked.
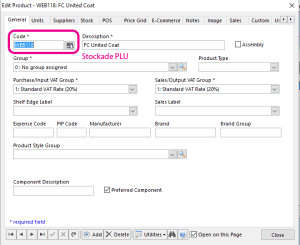
You can see which products are connected because the website SKU (Stock Keeping Unit) will match a Stockade PLU (Product Lookup Code)
We have 3 options for linking products together
- Upload products from WooCommerce (recommended)
- Download products from till
- Map products individually (not recommended)
Uploading products from WooCommerce
We recommend using our product uploading till from WooCommerce to the Stockade till, especially if you use product variations.
The information required to make products ready for web is different to what is required to make products ready for the till. To make ready for web, a product image and web-friendly description is important. To make products ready for the till, a barcode is important. The product categories for web and the till can also be different. Finally on a website you will likely want to group variations of products together for customers to purchase online, such as different sizes of clothing or different colours of a product.
When product variations are uploaded to the till, the variations are created as seperate products in the till. However if products from the till are downloaded, variations will not be grouped so will need to be deleted and re-created in a web-friendly manner.
To upload products:
- Create your product in WooCommerce
- Head to WooCommerce > Sync with Stockade
- Tick “Upload products to till?” then press Send WooCommerce to Stockade
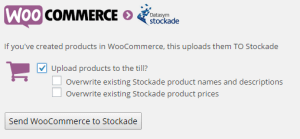
Note after we upload a product, we will automatically create a new connected product in Stockade.
We use the website product’s current SKU for the Stockade PLU if there’s one set, otherwise we create one starting with “WEB”.
We only upload products and variations that don’t already have “Connected to Stockade product” ticked.
What gets uploaded?
When products are uploaded to Stockade, they will be given the following information from the website’s product:
- Name
- Sales price (if there is one) or Regular price if there’s no sale currently active
- An opening stock level from the website
- Website SKU (if there is one) is used for the Stockade PLU
Although we upload an opening stock level from the website, ongoing stock management should be done within Stockade.
The website updates to get stock from the till but the till isn’t updated when stock is changed within the website.
The names and descriptions or prices can also be updated by choosing one of the following options:
- Overwrite existing Stockade product names and descriptions
- Overwrite existing Stockade product prices
If you want to keep some prices different for products in the website and your till, leave the price option de-activated. Also it is possible you may want to choose different names and descriptions within your till to your website, in which case don’t overwrite your existing Stockade names.
Products uploaded will not have any categories from the website uploaded, and they won’t have any barcodes. If you need to do more product admin changes to make them ready for your datasym till follow this guide below provided by Datasym:
Datasym product admin after upload
In Stockade, go to maintenance, products.
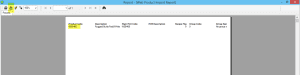
From the products browser select the small utils button and run the Product List Report (this needs to be setup by Datasym).
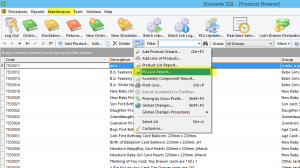
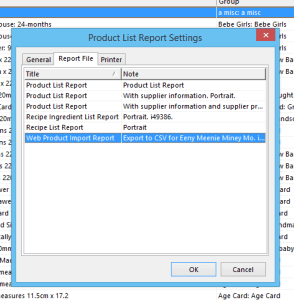
Run for everything (the report will contain its own filters to only export items that do not have a numeric barcode)
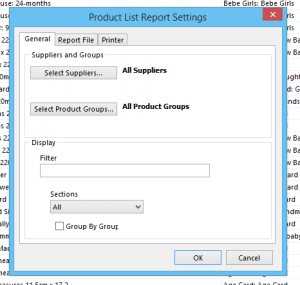
The report will be shown to screen and the export button (highlighted in yellow) can be used to create an editable CSV.
Modify the relevant rows and fields to match requirements. Suggested fields below (overwrite main PLU code (WEB123) with the actual barcode which will be added as an additional barcode when imported back into Stockade:

Once completed, export the file as a CSV. Then from Stockade, select Tools, Import/Export, Import products
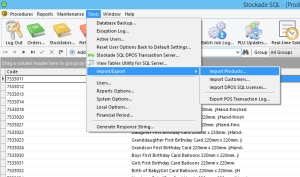
You can choose to view the log to see the results of the import. Check a product you have modified to ensure you are happy that changes have been made. Changes should go to the tills in close to realtime if this feature is enabled.
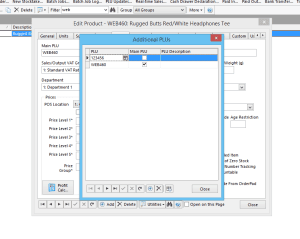
Above shows the additional PLU having been imported via the routine.
Downloading products
An alternative way to link products is to download products from the till to the website. To do this
- Create your product in Stockade
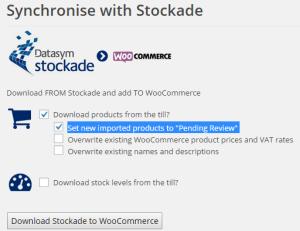
- Head to WooCommerce > Sync with Stockade
- Tick “Download products from the till?”, leave “Set new imported products to “Pending Review” ticked, then press Download Stockade to WooCommerce
Next go to Products > Edit review all the products that are currently set to pending review, add an image, web-friendly description and choose the categories they should belong to.
If you want to have product variations, you’ll need to delete the auto-downloaded product and will then need to link it manually after the download. The next section explains how to link manually.
Linking products manually
Whilst we don’t recommend this, products can be linked manually.
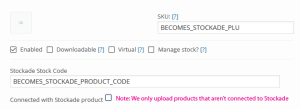
To do this there is some important product information that needs to be set:
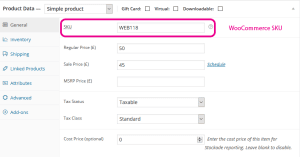
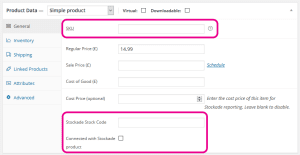
- WooCommerce product “SKU” must match Stockade PLU
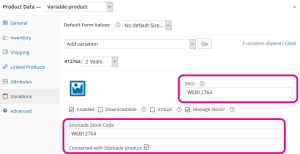
- WooCommerce “Stockade Stock Code” must match a Stockade product code
- WooCommerce “Connected to Stockade product” must be set to “yes”
The 2 information can be added per product in the highlighted areas:
Or on variations in the highlighted areas: